Showing posts with label Instructions. Show all posts

Friday, April 4, 2008

Will BlogPatrol work on my blog?

Will BlogPatrol work on my blog? In its current form, BlogPatrol will only work with blogs, blogging platforms, and blog hosting providers that accept javascript code. Here is a short list of compatible and non-compatible providers and platforms. When possible the provider or platform is linked to more information concerning compatibility/non-compatibility.

Blog Hosting Providers

Blogging Platforms
  • BlogPatrol currently works on WordPress hosted on your own server (i.e., not hosted by WordPress.com) For example, see the fun blog named Larry Hnetka Goes HMmmm which runs on WordPress 2.0.4.
  • ...more to be added...
Queue of platforms/providers to be categorized:
  • Adobe GoLive
  • AOL Journal
  • AOL Publisher / AOL Easy Designer
  • Bloglines
  • Dreamweaver
  • Dreamweaver MX 2004
  • FrontPage 2000/2002/2003
  • FrontPage/FrontPage Express
  • Googlepages.com
  • Homestead.com
  • HTML Code
  • iWeb
  • ixla Web Easy
  • Meetup
  • Microsoft Publisher 2000
  • Microsoft WordPad
  • Microsoft Word 2000/2003
  • mo'time
  • Movable Type 3.0
  • MSN Group
  • MSN Spaces Blog
  • MySite
  • Namo WebEditor
  • NetObjects
  • Netscope Gold or Netscape Composer
  • Ning.com
  • Open Diary
  • Print Shop 6.0 Web Designer
  • Roodo.com
  • Serif Webplus 8
  • Sierra's Web Studio 2.0
  • Site Meter HTML for a PHP-Nuke
  • Squarespace
  • Validating XHTML for XHTML 1.0 Strict and Transitional pages
  • Vox
  • WebExpress 4.0 Macmillan software Web Page Construction Kit 6.0
  • WebTV
  • Wikispaces
  • ...and more...

Last updated: June 13, 2008, 7:28 AM Eastern (UTC -4 America/New York)

If you like this article, then click on this link to "Digg It" and help promote BlogPatrol.com. Thanks!

Tuesday, January 29, 2008

How do I change the style of my BlogPatrol counter widget (icon or logo)?

Question: How do I change the style of my BlogPatrol counter icon (i.e., BlogPatrol widget or BlogPatrol logo) to a different style? or from an icon that shows the number of visitors to a stealth icon that does not?

Answer: You can change the style of your BlogPatrol counter icon at any time -- without having to re-install the code -- by logging into your BlogPatrol account, selecting a different style, and then saving the change(s) you have selected.

For more information, see the screen shot below. (Click on the picture to view an enlarged version of the image.)

If you like this article, then click on this link to "Digg It" and help promote BlogPatrol.com. Thanks!

Monday, July 23, 2007

Blogger Blogs, Step 1: Login to BlogPatrol

Back to Intro ~ Forward to Step 2

Add BlogPatrol to a Blogger (Blogspot.com) blog
in 5 STEPS


The following information will help you to install BlogPatrol's counter code to your Blogger (i.e., yourblogsite.blogspot.com) blog in 5 easy steps:
  • Step 1: Login to BlogPatrol
  • Step 2: Copy BlogPatrol Code
  • Step 3: Login to your Blogger blog
  • Step 4: Paste BlogPatrol Code
  • Step 5: Verified? Congratulations!
Screen shots are included with each step as visual aids for users who are still getting familiar with the process of adding services like BlogPatrol to a blog.


STEP #1 – Login to BlogPatrol

To get started, open a second browser window (or tab) so that you can keep these instructions available in this browser window.

Screenshot 1 of 3: Go to BlogPatrol.com and click on the LOGIN link.


Screenshot 2 of 3: Once the login page appears, type in your BlogPatrol user name and password (both are cAsE sEnsItiVe) and then click on the LOGIN button.


Screenshot 3 of 3: Once you have logged in successfully, BlogPatrol will open a page with the header ACCOUNT SETTINGS that will include the data fields that allow you to manage your account (e.g. Username, Created On, Email, URL, Ban up to four IP addresses, Timezone, Counter style, etc.):


Back to Intro ~ Forward to Step 2

If you like this article, then click on this link to "Digg It" and help promote BlogPatrol.com. Thanks!

Blogger Blogs, Step 2: Copy BlogPatrol Code

Back to Step 1 ~ Forward to Step 3

STEP #2 – Retrieve and copy the BlogPatrol Code

The following instructions and screenshots will help you to RETRIEVE and COPY the BlogPatrol Counter Code into your computer’s clipboard.

Screenshot 1 of 6: First, click on the RETRIEVE COUNTER CODE link located in the MY ACCOUNT SETTINGS menu.


Screenshot 2 of 6: BlogPatrol will display a page that has the header titled RETRIEVE COUNTER CODE.


Screenshot 3 of 6: Click inside the box that contains your BlogPatrol Counter Code.


Screenshot 4 of 6: Select the counter code by either (a) clicking on Edit --> Select All from the Menu at the top of your browser or (b) using the Ctrl-A keyboard shortcut (pressing the CTRL key and the letter A key at the same time).


Screenshot 5 of 6: Once you have selected the code, your browser will highlight all of the counter code inside the box.


Screenshot 6 of 6: Now COPY the COUNTER CODE by either (a) clicking on Edit --> Copy on the File menu at the top of your browser or (b) by using the Ctrl-C keyboard shortcut (pressing the CTRL key and the letter C key at the same time).


Back to Step 1 ~ Forward to Step 3

If you like this article, then click on this link to "Digg It" and help promote BlogPatrol.com. Thanks!

Blogger Blogs, Step 3: Login to your Blogger blog

Back to Step 2 ~ Forward to Step 4

STEP #3 – Login to your Blogger blog

Important Tip: Open a third browser window (or tab) in order to login to your Blogger blog. Remember to keep your first window open for these instructions and your second window open for your BlogPatrol account.

Screenshot 1 of 4: Login to your Blogger account by (a) typing your Blogger Username and Password (both are cAsE sEnsItiVe) and (b) click on the SIGN IN button:


Screenshot 2 of 4: When you have successfully logged in, the Dashboard home page for your blog will appear.


Screenshot 3 of 4: Click on the LAYOUT link near the middle center of the Dashboard home page.


Screenshot 4 of 4: You will get a new page that includes:
(a) three tabs with the tab labeled Template selected by default,
(b) the subheading Add and Arrange Page Elements, and
(c) three different locations titled Add a Page Element, in the screen shot below as c1, c2, and c3.


Back to Step 2 ~ Forward to Step 4

If you like this article, then click on this link to "Digg It" and help promote BlogPatrol.com. Thanks!

Blogger Blogs, Step 4: Paste BlogPatrol Code

Back to Step 3 ~ Forward to Step 5

STEP #4 – Paste BlogPatrol Code to your blog template

The next step is to Add a Page Element by Pasting the BlogPatrol code into the appropriate area of your blog's template.

Screenshot 1 of 10: Click on one of the three (3) links titled by Blogger as Add a Page Element , labeled in the screen shot below as (c1), (c2), and (c3). These three template choices allow you determine you want to place your BlogPatrol counter widget on your blog.


Screenshot 2 of 10: A new browser window will appear with the heading Choose a New Page Element. Click on the ADD TO BLOG button for HTML/JavaScript element.


Screenshot 3 of 10: Another new window will appear with the title Configure HTML/JavaScript. The cursor is blinking automatically inside the Title field.


Screenshot 4 of 10: A Title, such as BlogPatrol Free Blog Counter, is optional.


Screenshot 5 of 10: Click inside the box labeled Content so that the cursor is blinking inside it.


Screenshot 6 of 10: Paste the BlogPatrol code either by:
(a) by right-clicking your mouse (cursor) inside the Content box and selecting the word Paste, or
(b) using the Ctrl-V keyboard shortcut (pressing the CTRL key and the letter V key at the same time).


Screenshot 7 of 10:The BlogPatrol counter code now appears in the Content box.


Screenshot 8 of 10: Click on the SAVE CHANGES button.


Screenshot 9 of 10: If the information saves successfully, the smaller browser will disappear automatically and you will get the message Changes saved for... in the middle center of the browser window logged into your Blogger account.


Screenshot 10 of 10: Click on the View Blog link to verify that everything is correct.


Back to Step 3 ~ Forward to Step 5

If you like this article, then click on this link to "Digg It" and help promote BlogPatrol.com. Thanks!

Blogger Blogs, Step 5: Verified? Congratulations!

Back to Step 4 ~ Go to BlogPatrol.com

STEP #5 – Verified? Congratulations!

Screenshot 1 of 5: If you are able to see the BlogPatrol counter widget icon on your blog, then you have successfully completed the installation of BlogPatrol for your blog.


Screenshot 2 of 5:Now go to the browser window that is logged into your BlogPatrol account and click on the View Statistics link.


Screenshot 3 of 5: Your BlogPatrol stats reports will display the daily (and total) number of visitors and hits to your blog.


Screenshot 4 of 5:Click on any of the report links to view the report information you wish to see. For example, click on the View All Statistics link to generate all the reports at once.


Screenshot 5 of 5: Congratulations! You have added BlogPatrol and are now tracking your visitors to your blog!


Back to Step 4 ~ Go to BlogPatrol.com

If you like this article, then click on this link to "Digg It" and help promote BlogPatrol.com. Thanks!

Sunday, June 10, 2007

BlogPatrol Signup Instructions

Please Remember: Getting a free BlogPatrol account involves two different steps:

  1. SIGNING UP for a BlogPatrol account (read on)
  2. INSTALLING the BlogPatrol code on your blog
The following instructions correspond to each of the data fields that you need to complete in order to signup for a BlogPatrol account:
  • Create a Username: Select a username that is memorable to you and different from any other username in the BlogPatrol system. You may use letters and numbers, not use spaces, in your username. Both usernames and passwords are cAsE sEnsItiVe, and neither can exceed 255 characters in length.
  • Create Password: Type in a password for your new BlogPatrol account. The password must be a minimum of four (4) letters, numbers or special characters.
  • Verify Password: Type your password again to verify it is the one you want.
  • Your Email Address: It is important to register a working email address with your BlogPatrol because BlogPatrol will email your new account information and password to you for your records. On rare occasions, we email announcements regarding the BlogPatrol service. We will only ever email in you regard to your BlogPatrol account or the BlogPatrol service. For more info, visit the BlogPatrol privacy policy, terms of use, and conditions of service.
  • Your Blog's URL: Type in the address or URL of the blog or website that you want BlogPatrol to track for you. Can BlogPatrol track more than one blog for you? Yes, visit this post for details.
  • Select a Timezone: BlogPatrol now displays your stats reports in the timezone that you select. Use the drop-down list to select your preferred timezone.
  • Select a Counter Style: BlogPatrol currently offers 18 visible counter widget styles that display your total unique visitors count. We also provide 6 stealth counter widget styles that do not display any numbers. You're welcome to choose any counter style, and you can change the style any time by logging in, selecting a different style, and clicking the Modify button. Remember that our terms of use require that you must display the BlogPatrol counter icon on your blog or website in order for your account to work properly.
  • Starting Counter Value: You can type in the value that you want for your BlogPatrol account. The default starting value for a new account is zero.
  • Want to Ban an IP? You can use the Get my IP button to identify and ignore the Internet Protocol (IP) address of the computer that you are using to signup for your BlogPatrol account. Use the Clear IP button to remove any IP address that you no longer want BlogPatrol to ban (ignore).
  • I wish to label the above IP address as: Select one of the following labels for this IP address : home, work, wireless or other. You may notice that the default label is Home IP, but you can update the address or change the label any time.
  • Verify Image (Captcha): Verify the image by typing the word that appears inside the image box. If you are unable to read the image displayed, then you can generate a new one by clicking on the Click Here link. This function helps BlogPatrol to prevent spam-related signups, lost password requests, and email solicitations. Wikipedia provides a helpful article explaining why is called "Captcha" (Completely Automated Public Turing test to tell Computers and Humans Apart).
  • __ Use commas to separate numbers (by the thousands) on my BlogPatrol counter icon: For example, if you select this option, then your counter icon will display your stats as "1,000,000" unique visitors. If you do not select this option, then your counter icon will display the same number as "1000000" unique visitors.
  • __ Password-protect my stats reports so that they do not appear in Google's search results: For more information on this option, refer to the details provided in our privacy policy.
  • __ Include my site in the BlogPatrol Top 100 List: Select this option to include your blog in the publicly viewable directory of BlogPatrol's highest ranking blogs by total hit counts. To see the current rankings, go to Top Blogs. For more information on this option, refer to the details provided in our privacy policy.
To view a screen shot of the BlogPatrol signup form in its entirety, click on this image:


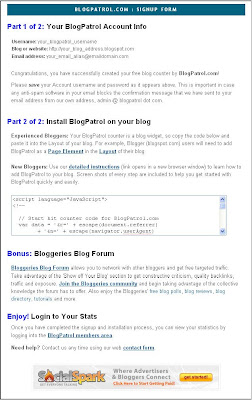
Once you have signed up for your BlogPatrol account, you will get the following Success Form (click on the image to see an enlarged version of the sceenshot):


If you're unfamiliar with how to install blog widgets like BlogPatrol's countercode, check out our install instructions for adding BlogPatrol to your Blogger blog (e.g., yourblog.blogspot.com).

If you have a question that requires individualized attention, please email us using our contact form. Thanks for signing up for BlogPatrol!

If you like this article, then click on this link to "Digg It" and help promote BlogPatrol.com. Thanks!

Monday, February 12, 2007

How do I add BlogPatrol to my blog?

Please Note: Getting a free BlogPatrol account involves two parts:

  1. SIGNING UP for a BlogPatrol account
  2. INSTALLING the BlogPatrol code on your blog (read on)
The following instructions are to help you install the BlogPatrol code onto your blog. Click on the instructions that apply to your blog hosting provider:
  • Blogger or Blogspot.com blogs (e.g. yourblog.blogspot.com): Install using Page Elements

  • TypePad.com blogs (e.g. yourblog.typepad.com): Install using Notes Typelist or Advanced Templates

  • Instructions for more blog types coming soon...

Feel free to contact us any time with questions about installing BlogPatrol to your blog.

Last updated on January 26, 2008, at 4:00 PM UTC-5 America/New York.

If you like this article, then click on this link to "Digg It" and help promote BlogPatrol.com. Thanks!